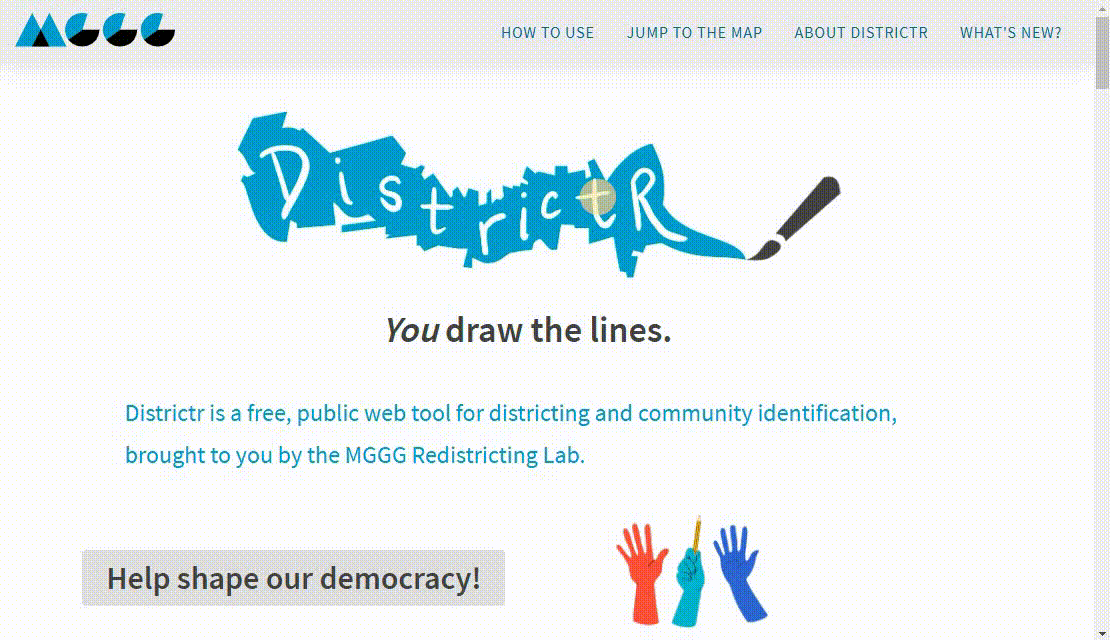
On the Districtr homepage, click “Jump to the Map” in the top right corner.
You will be redirected to an interactive map of the United States. Click the state for which you wish to
make a districting plan. All states are available, as well as Washington, D.C. and Puerto Rico.
Once you have selected a state, you will be directed to its landing page, which contains all mapping
options along with background information. Click on “Communities” at the top to activate Communities
options, which are in red.
Choose a locality and unit type by clicking on a red card. (Additional localities can be added upon request.)
You will now be redirected to your selected districting page.
Main Tools
Moving across the map
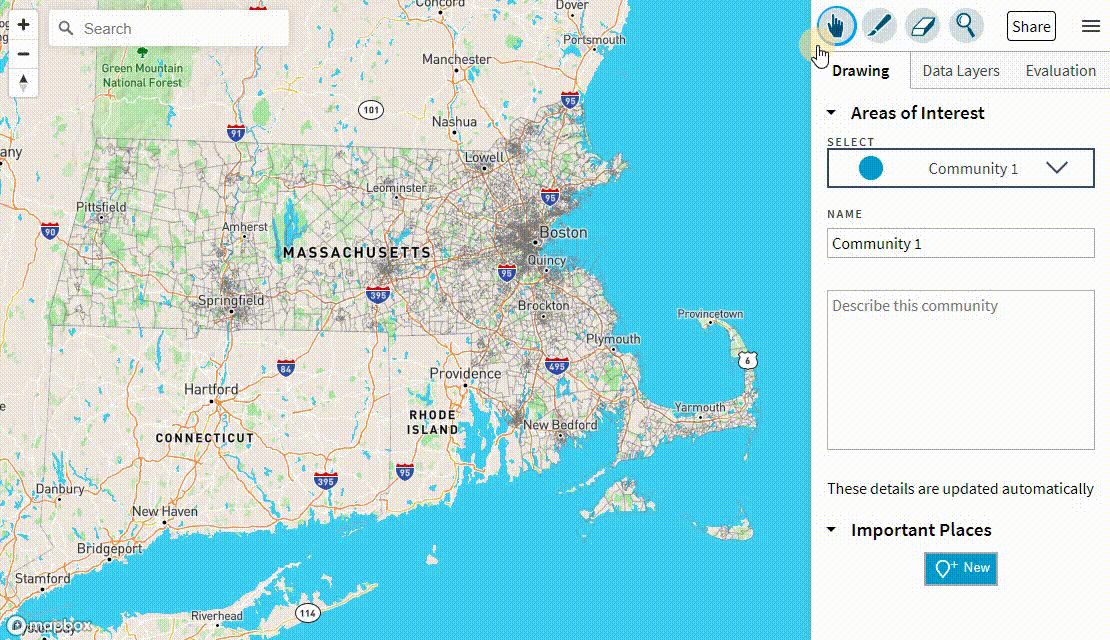
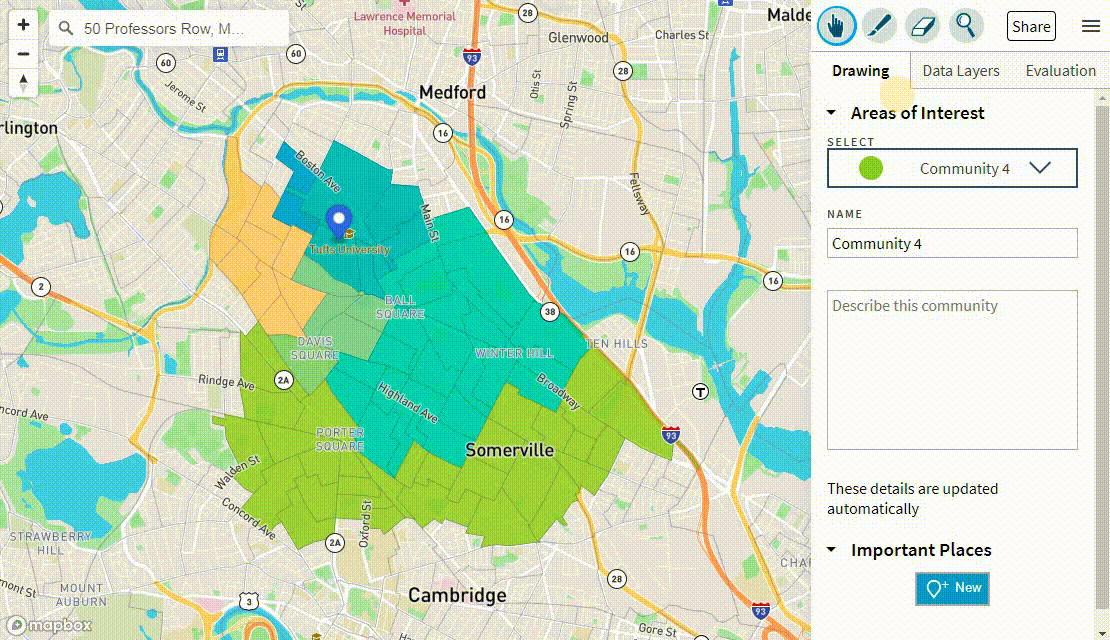
Select the hand icon in the top right corner of the page. Then click and drag to pan across the map.
To zoom in and out, use the plus and minus buttons in the top left corner of the map. You can also use a
mouse scroll wheel or trackpad.
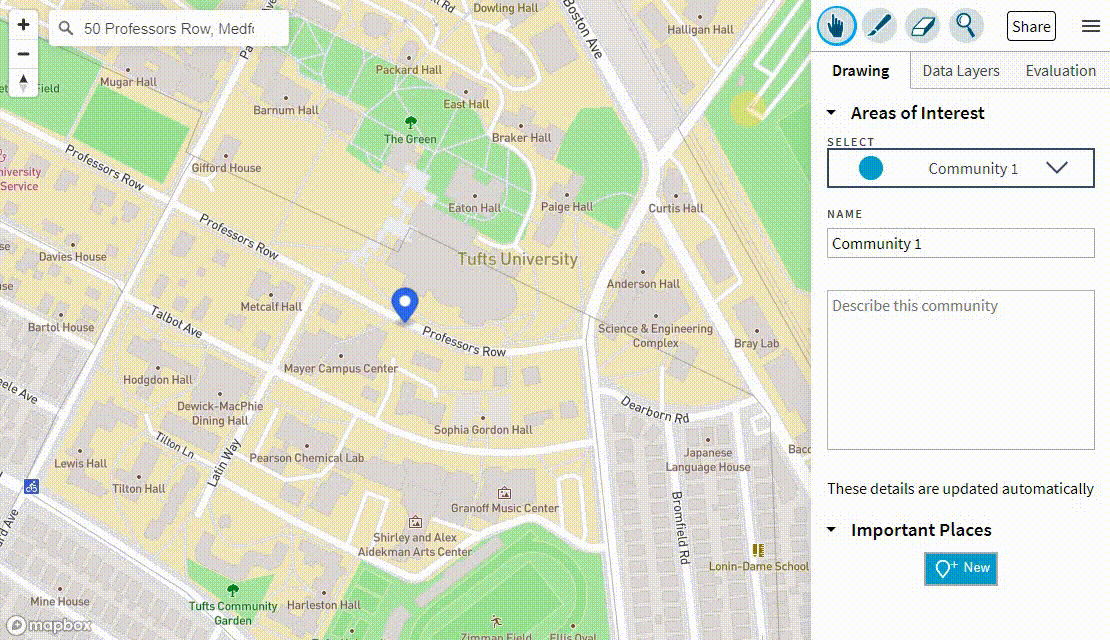
Type in a street address, place name, town, or zip code to be directed to that location on the map.
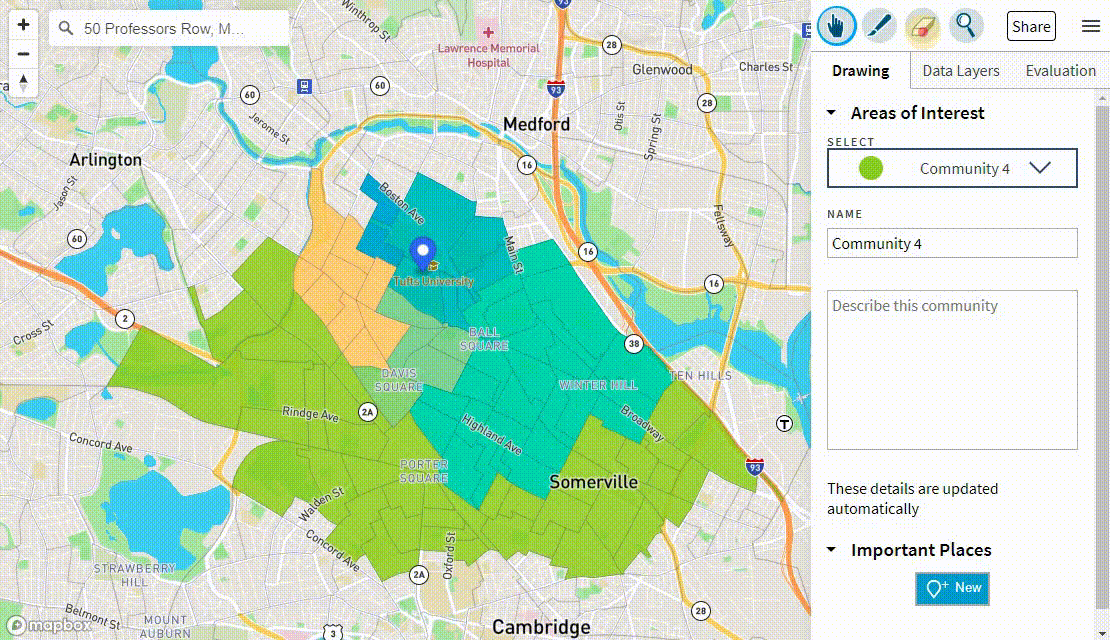
Drawing your communities
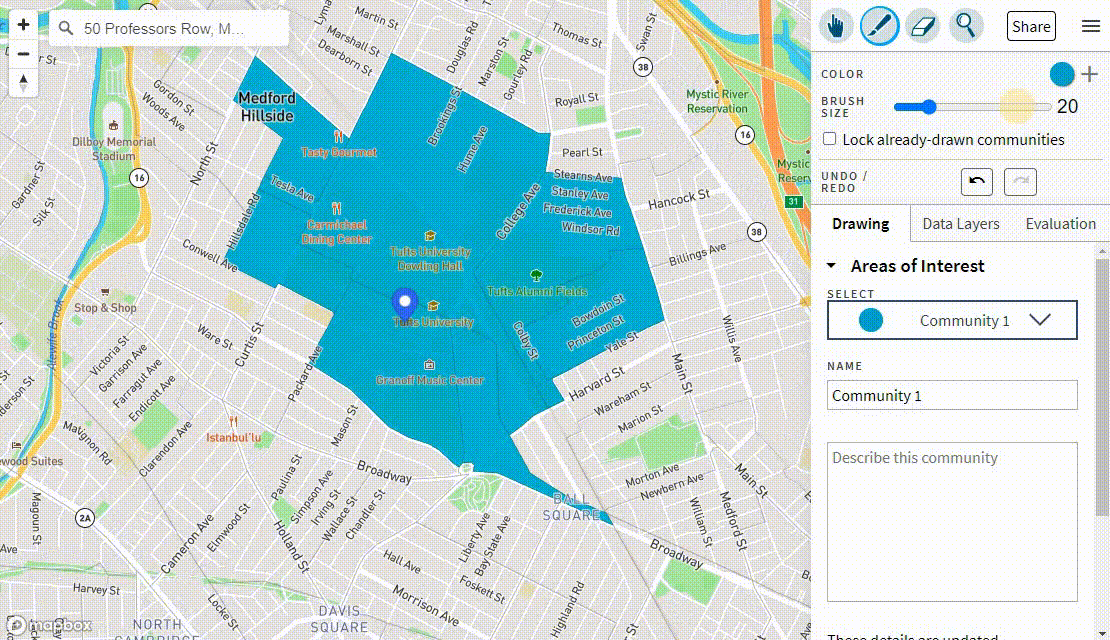
To draw your first community, select the paintbrush in the top right corner of the page. Click and drag
on the map to add units to your community.
To draw an additional community, add a new color from the color bar by selecting the plus sign. A new
color will appear and will be automatically selected for your use.
To change the size of the brush, drag the slider directly below the color bar or use the up/down arrows
to the right of the slider.
To draw communities without overlapping them with the previous ones, toggle the “Lock already-drawn
communities” box.
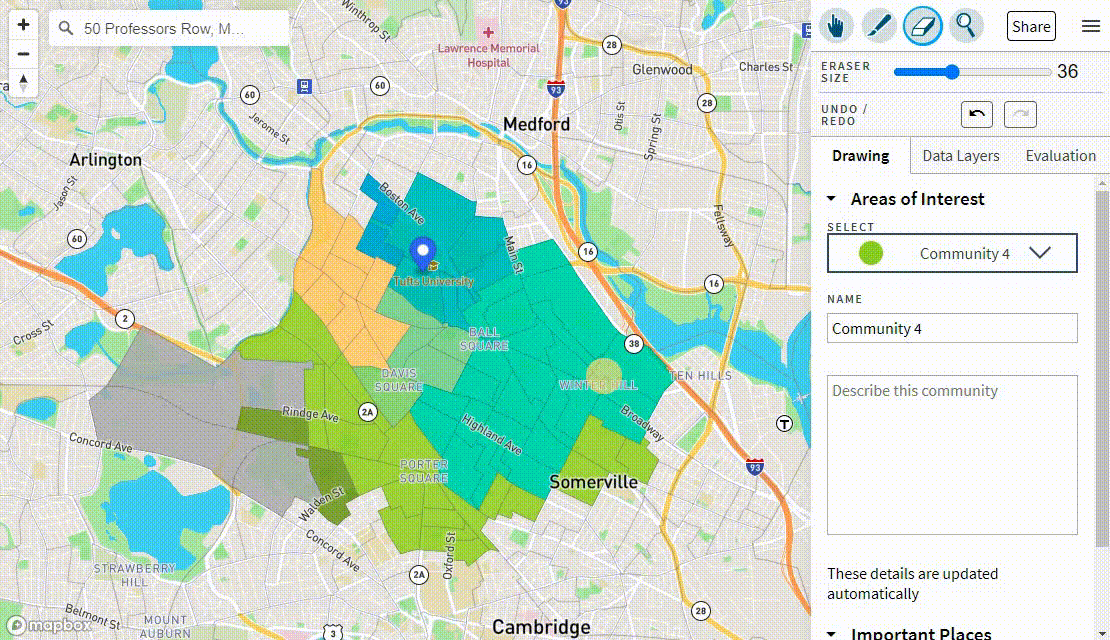
To correct the boundaries of your communities, click the erase icon in the top right corner of the page.
Click and drag to remove units from that community. The size of the eraser can be adjusted by dragging the
slider or using the arrows to its right.
Alternately, click the “undo/redo” buttons to revert the boundaries of your communities to a previous
version. You can undo/redo as far back as your most recent use of the paint tool.
Examining the districts
To see detailed population or election information for a particular unit or group of units, select the
magnifying glass in the top right corner.
Click the Tooltip Data dropdown menu to change the type of information shown. Then mouse over a
particular unit to see the corresponding information for that unit.
To examine multiple units, drag the slider directly below the Tooltip Data menu or use the arrows to the
right of the slider.
Tabs
Drawing
The drawing tab allows you to name and describe each of the communities you have mapped, as well as
adding important places from the area.
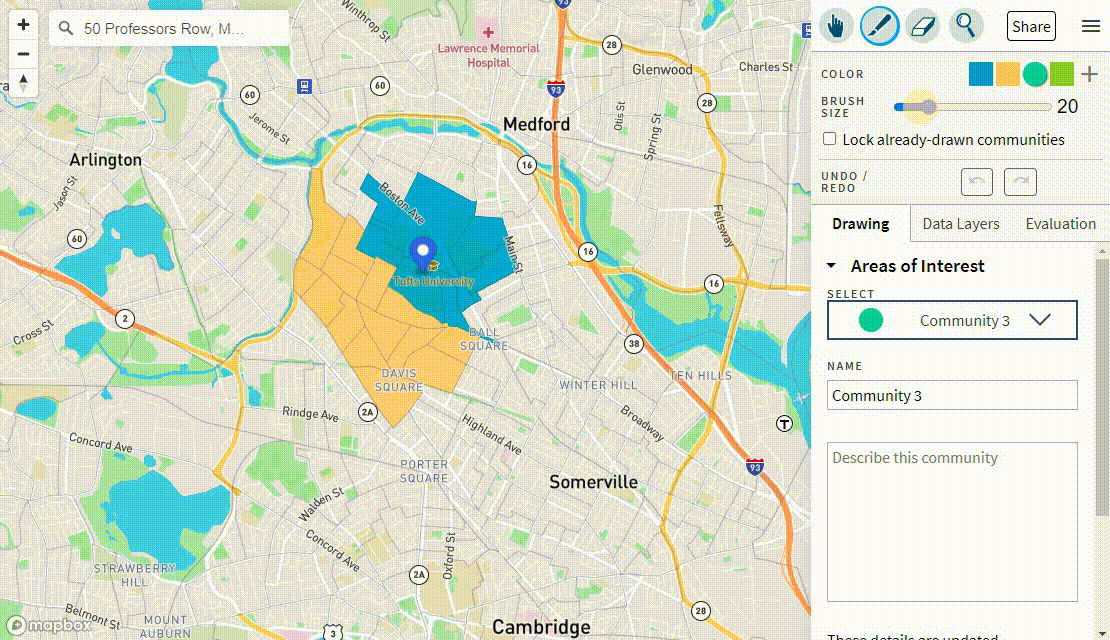
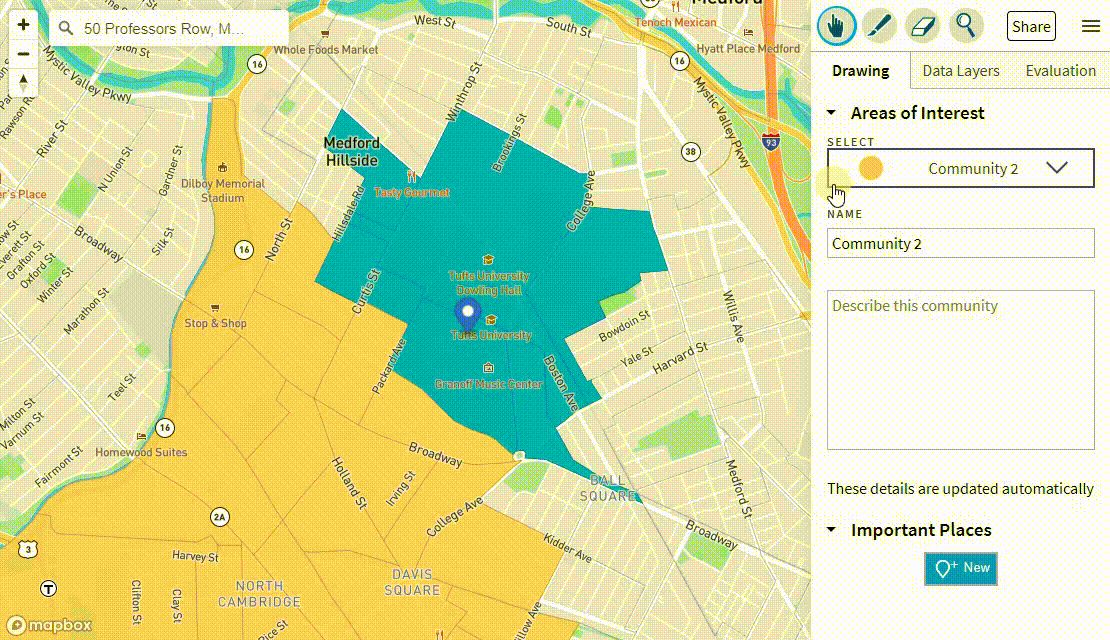
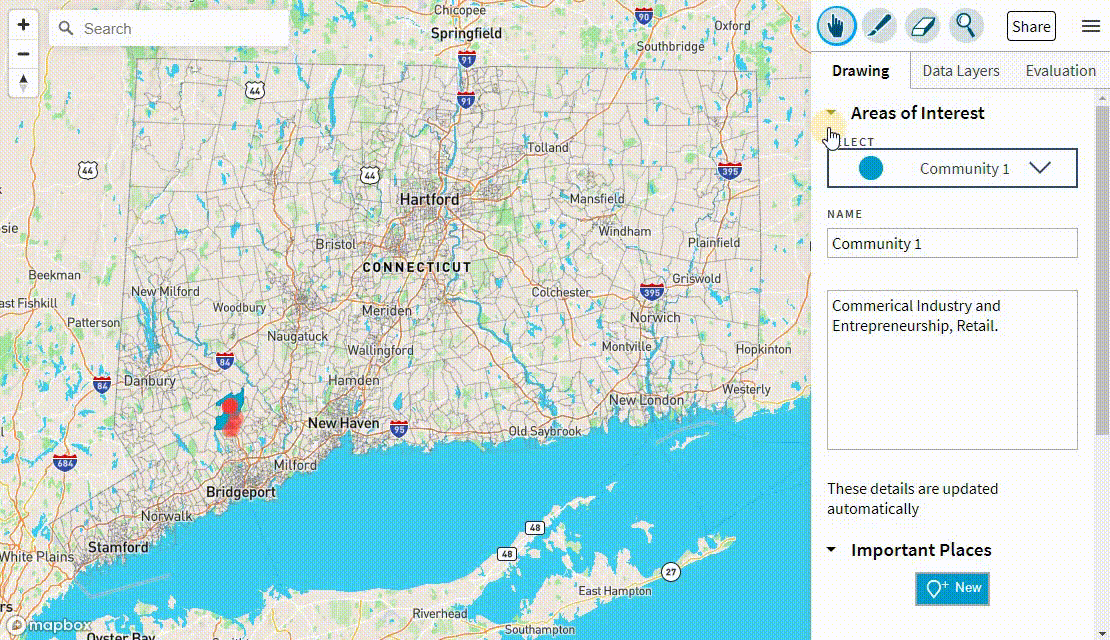
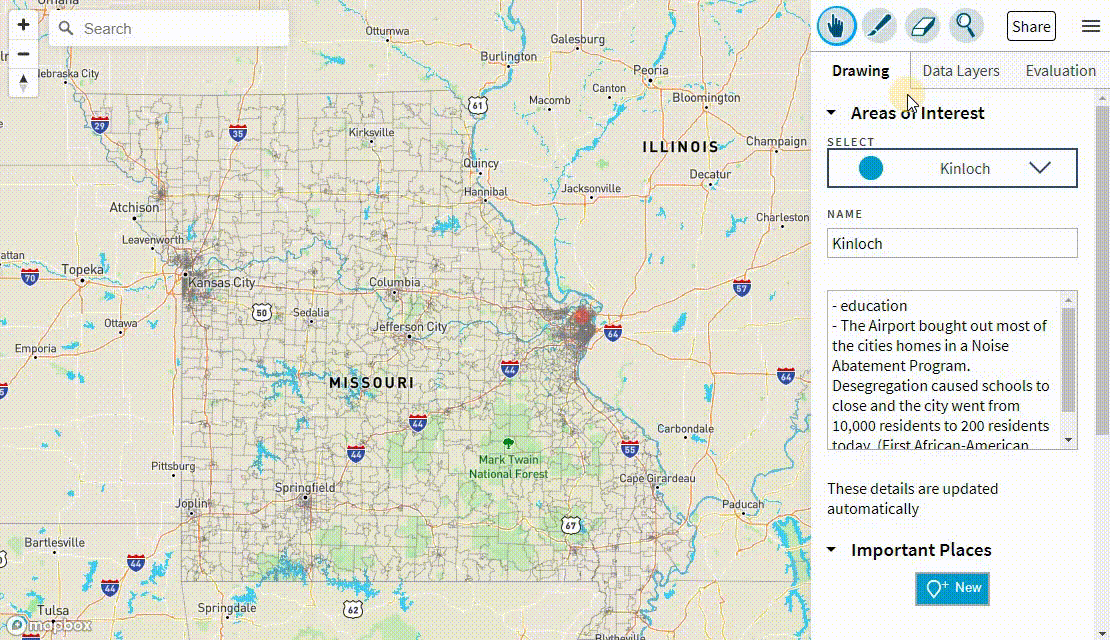
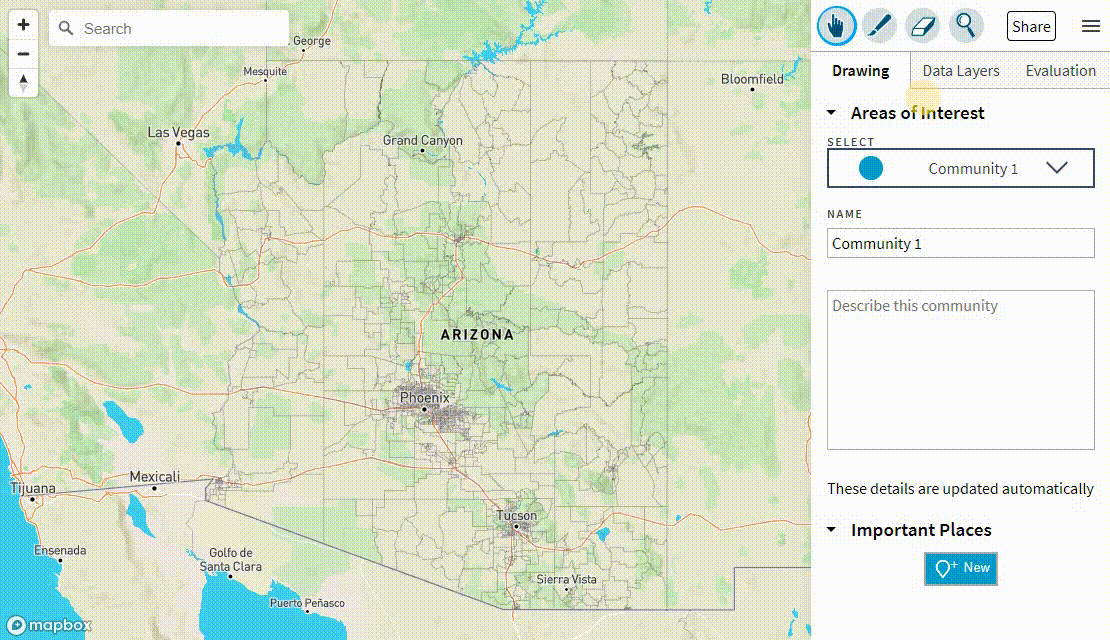
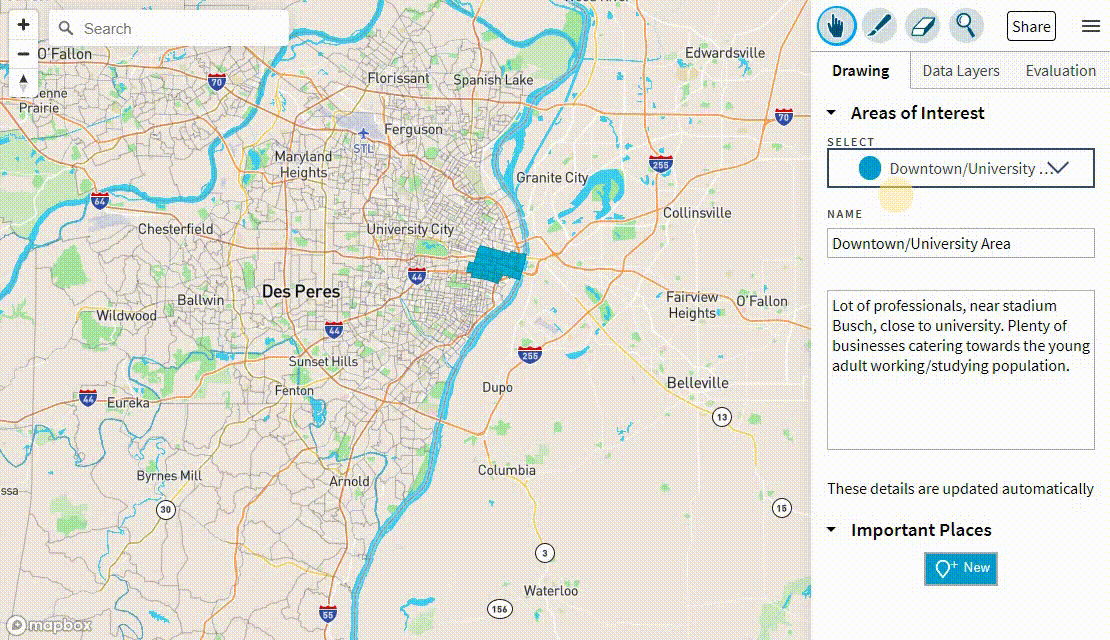
Areas of Interest
To select one of the areas you have mapped to name and describe, click on the drop-down menu and
choose one of the ‘Communities’. They are numbered in the order that they were first drawn on the map,
and they also have their corresponding color next to the name.
Once you selected the community from the menu, below you can change the name and add a description for
the area. Those details are updated automatically.
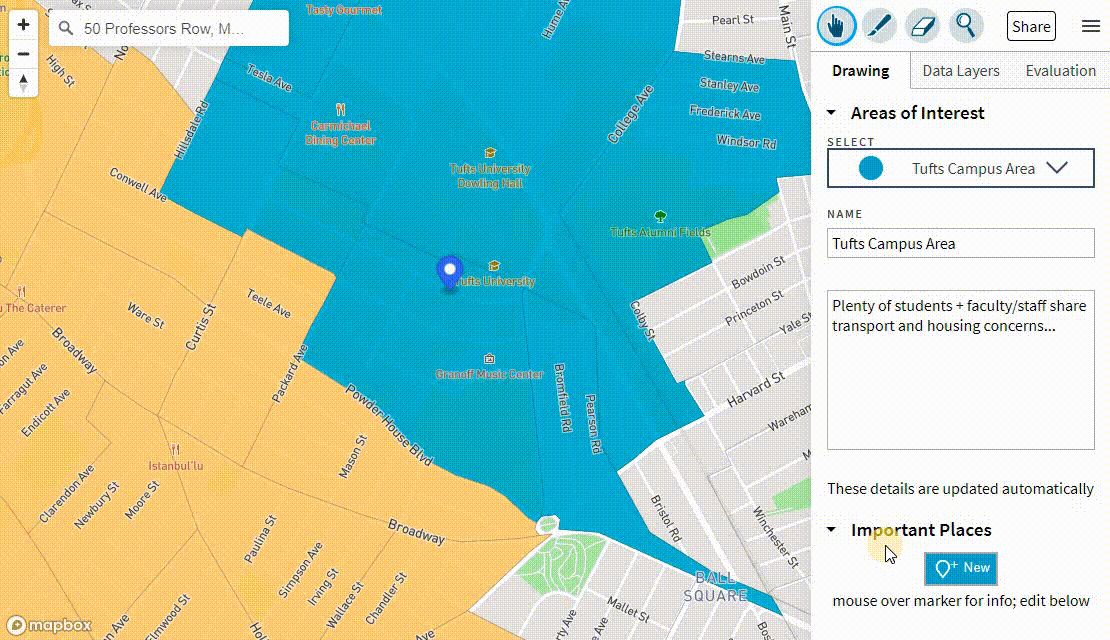
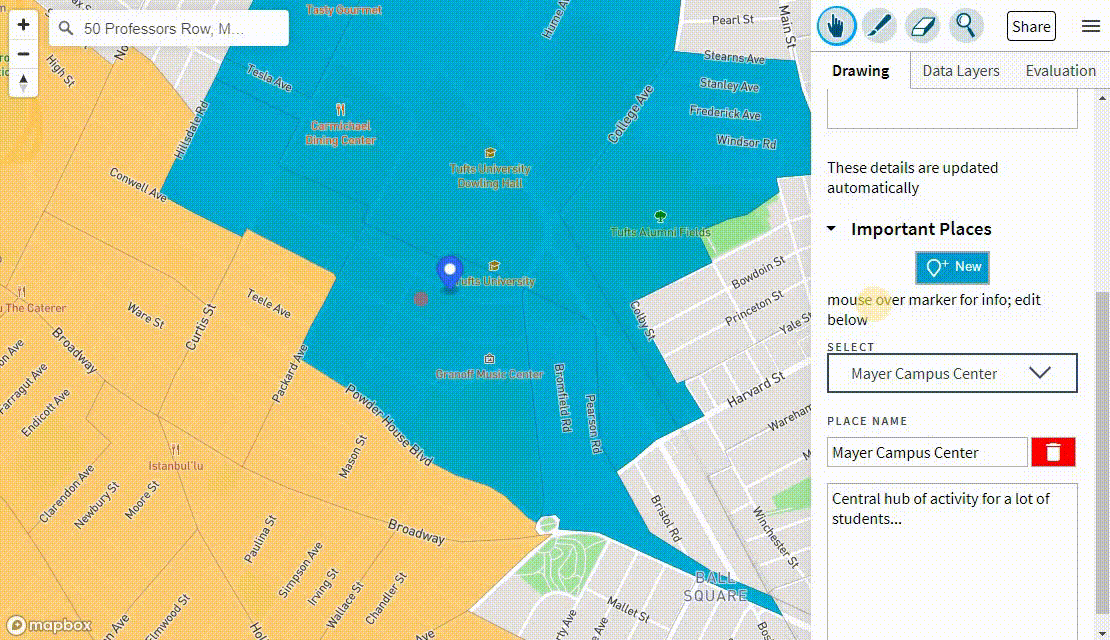
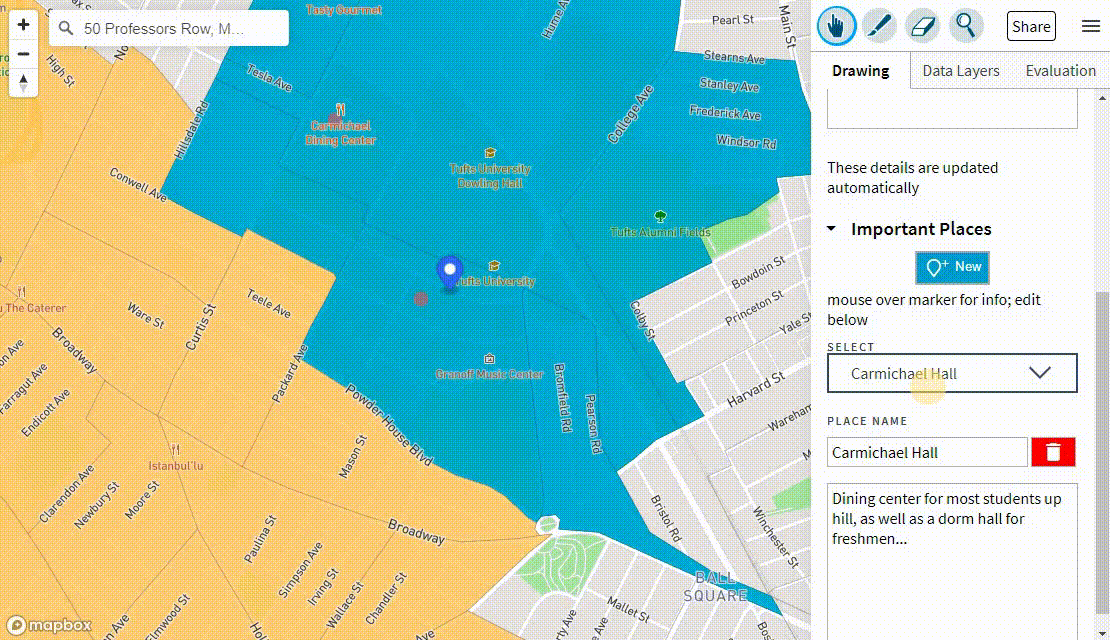
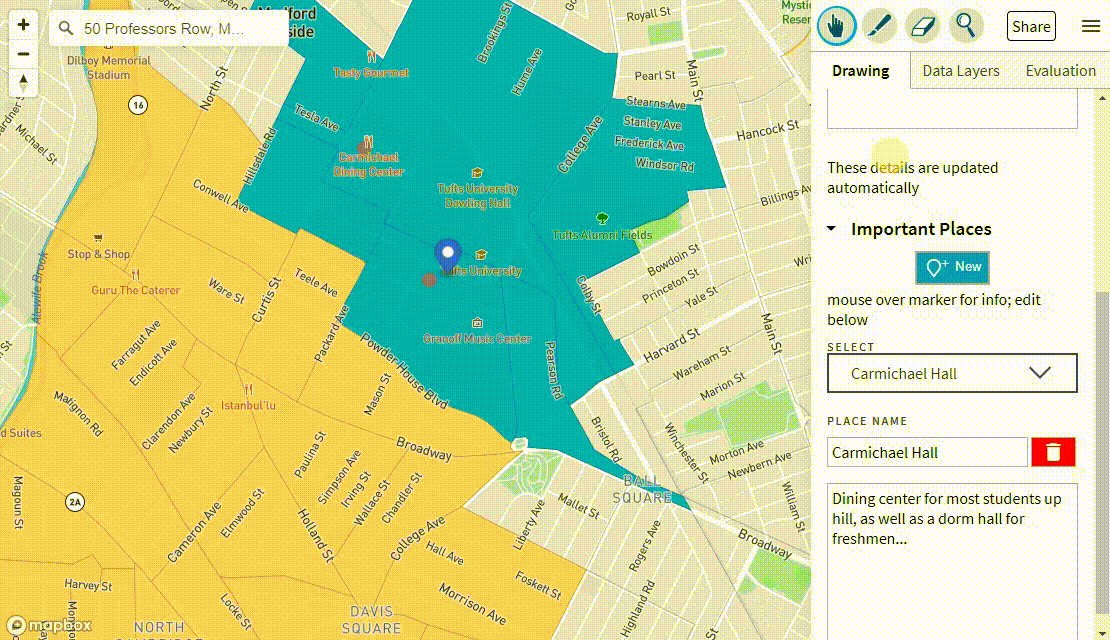
Important places
To add a point of interest for your community, go to the important places section and click on the
blue button that says ‘New’.
Pressing the button will prompt you to locate the spot on the map that you want to add as a point.
Click on the map to add it.
Once you add a point in the map, you will be able to name it and give a description about the place.
These changes will be saved automatically. The points you added will also stay on the map, and you can
hover over them to see their names and descriptions.
To add more important places, press the ‘new’ button again, and repeat the previous steps. To switch
between points, use the drop-down ‘Select’ menu. You can then edit place names and descriptions of the
selected place.
To remove a place you added, click on the red trash can button next to its name.
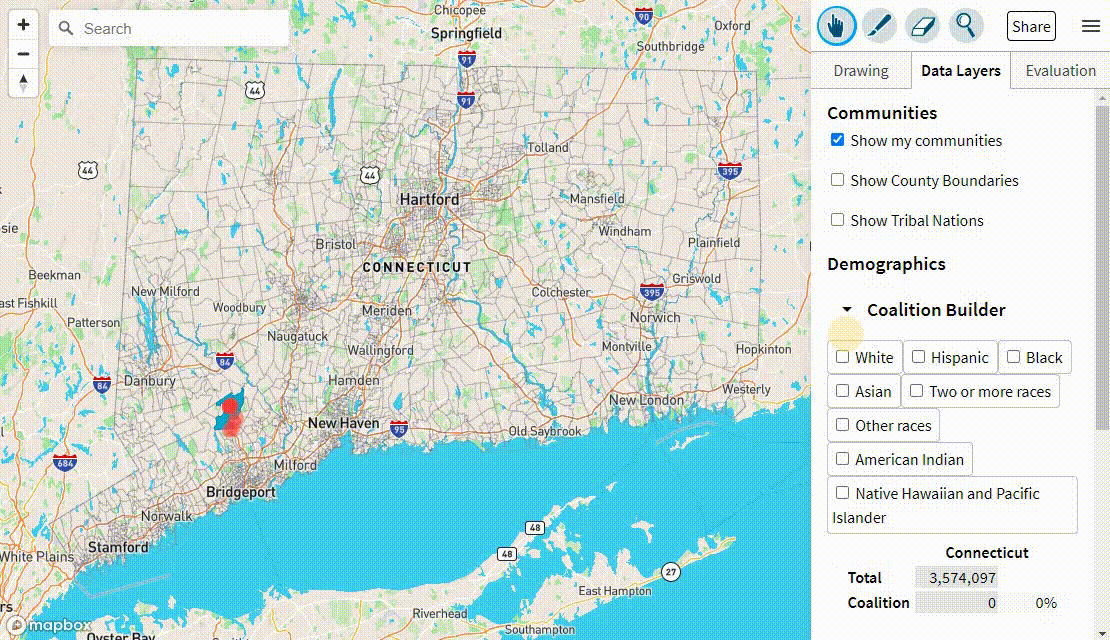
Data Layers
The Data Layers tab allows you to display community, demographic, and electoral data, as available.
Communities
To hide the communities from the map, toggle the “Show my communities” box at the top of the tab.
To display county boundaries, toggle the “Show County Boundaries” box.
To see the boundaries and names of Nations and Tribes, toggle the “Show Nations and Tribes” box. Names
of this field vary slightly by local naming conventions.
Demographics
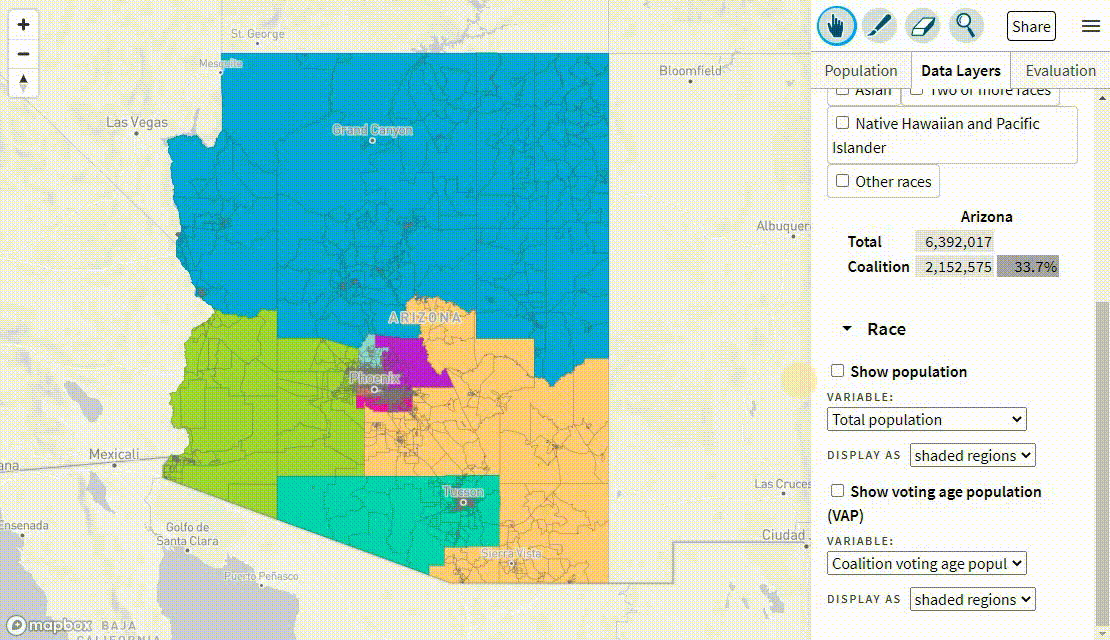
Coalition Builder
Using the Coalition Builder tool, you can combine multiple demographic groups of your choosing into
a shared “Coalition population.” Check off the name of each demographic group to add the group to your
Coalition, and click again to uncheck and remove a group. Below the selection buttons, you can view
the total population of the Coalition as well its percent composition of the jurisdiction as a whole.
Under the “Show population” and “Show voting age population” tabs, select the Coalition population
from the dropdown menu to display this layer on the map.
Race
Toggle the “Show population box” and select the desired variable from the dropdown menu to view
percent variable by unit. Using the dropdown menu for Display, choose to display the data as sized
circles or shaded regions.
Socioeconomic data
Several states and other areas feature socioeconomic data from the American Community Survey (ACS).
Available data include but are not limited to homeownership, household income, and broadband access.
(Note: ACS data can be added to additional places upon request.)
Previous elections
Toggle the “Show partisan lean” box and select the desired set of election results from the dropdown
menu to view partisan lean by unit. Using the dropdown menu for Display, choose to display the data as
sized circles or shaded regions. Please note that this option is only available when building your
communities out of precincts.
Evaluation
The evaluation tab allows you to see the racial, voting age population, and partisan balance of the
communities you are mapping. Some communities pages have additional data for evaluation, such as household
income and age.
Population by Race
You can compare the percentage of the population by race in each of your communities, and compare it
to the overall composition of the state you are drawing in.
Voting Age Population by Race
As in the previous section, you can compare the percentage of the voting age population by race in
each community. Voting Age Population (or VAP) is the group of people who are 18 years or older.
In some modules, we feature Citizen Voting Age Population (or CVAP), especially when it is cited in local guidelines.
Age Histograms, Household Income, and other data
In some areas, there are options to evaluate additional demographic information, such as age and
household income, in each community and compared to that of the overall locality. As with the Data
Layers tab, this information is from the ACS.
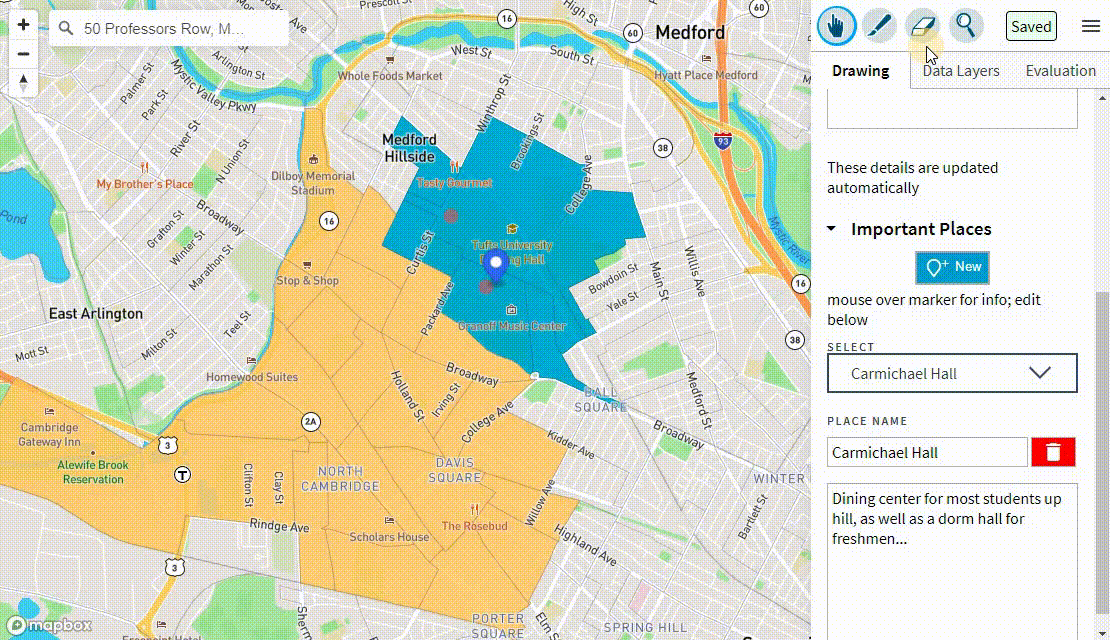
Sharing your Map
Clicking on the “Share” button saves the map you created and uploads it to the Districtr database. You do
not need to create an account, and only the information in your map is shared.
As long as you are in the same browser session, you can update this original map, leaving the link
unchanged. To save changes made to the map, click on the “Update” button (in the same location as the
“Share” button once you have shared). You will know when your map is up to date when the button says
“Saved.” You can keep repeating this process to edit and re-save your map as long as you are in the same
browser session.
Anyone who has the link, including you, can open up the map in their browser and make additional changes
to it. This edited map doesn’t replace the previous one, but you can save it to a new link by clicking
“Share” again.
Anyone who has the link, including you, can open up the map in their browser and make additional changes
to it. These changes can be saved to a new link by clicking “Share” again. When the button says “Saved,”
this means all changes are saved to the new link.
Whenever you need a copy of the link, click on the “Saved” button.
To download your map, choose from the options in the drop-down menu in the upper right corner. For more
detail on these, refer to the Import/Export Options page.
Tags
The Districtr team can help organize your map collection effort by setting up a tag for your organization.
A tag page is a customized landing page with a direct link to the mapping modules you'll be using and a submission
gallery showing maps that have been submitted with your group's tag. This helps organizers compile and compare a large
number of maps for a specific area, and possibly choose one or a few to highlight in their advocacy.
Once a tag has been created, users can enter it in the "Tag or Event Code" field that appears when they save a map.
(If you entered a module through a tag page, this field will be pre-filled.)
Getting Started with Districts
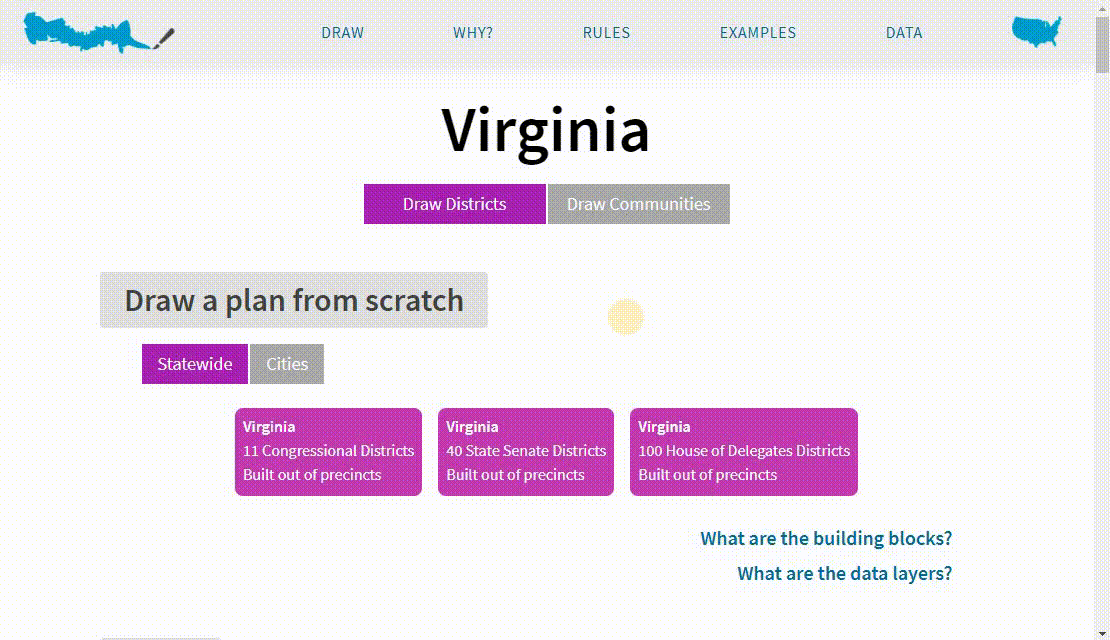
On the Districtr homepage, click “Jump to the Map” in the top right corner.
You will be redirected to an interactive map of the United States. Click the state for which you wish to
make a districting plan. All states are available, as well as Washington, D.C. and Puerto Rico.
Once you have selected a state, you will be directed to its landing page. The landing page contains all
mapping options along with background information. Districting options are in purple, which is the default
setting.
Choose a locality (state, region, county, or city) and district type by clicking on a purple card. The
available localities and districts vary by state. (Additional localities can be added upon request.)
You will now be redirected to your selected districting page.
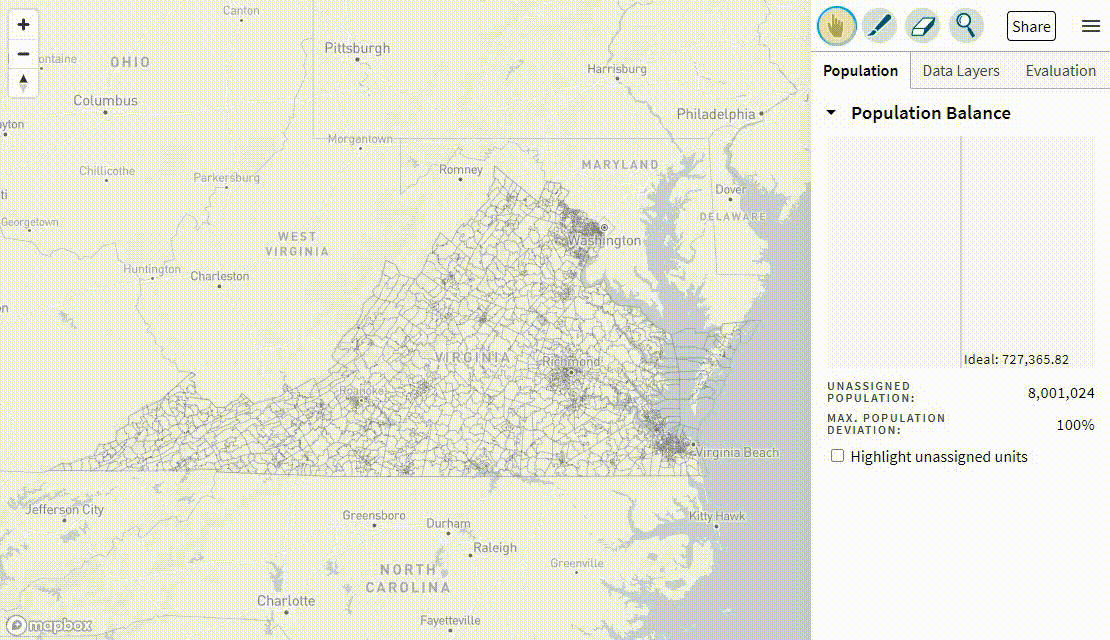
Main Tools
Moving across the map
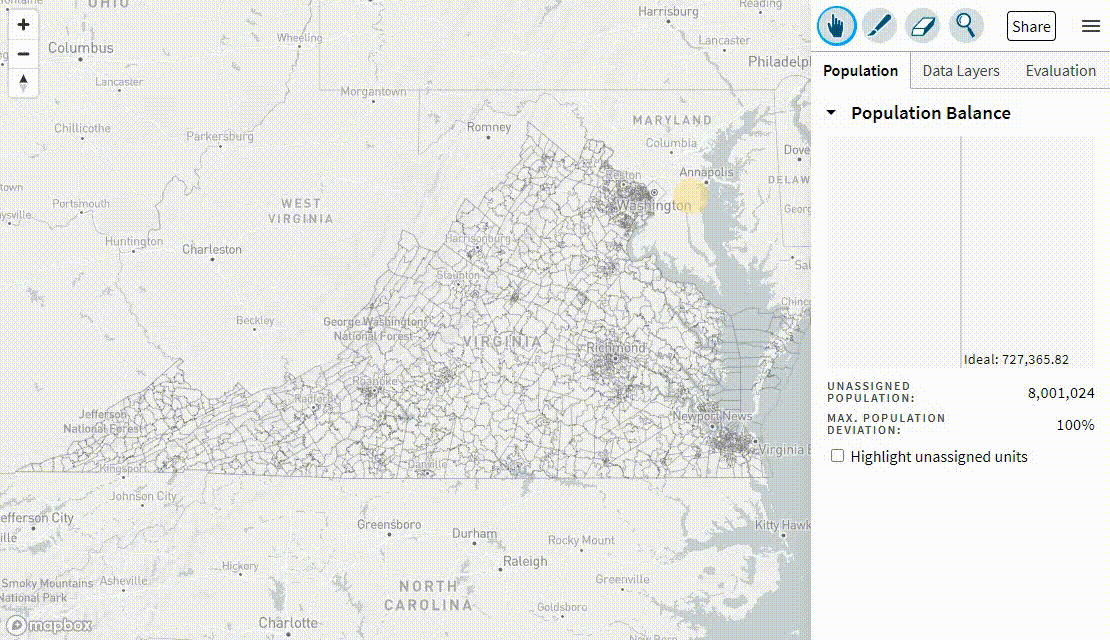
Select the hand icon in the top right corner of the page. Then click and drag to pan across the map.
To zoom in and out, use the plus and minus buttons in the top left corner of the map. You can also use a
mouse scroll wheel or trackpad.
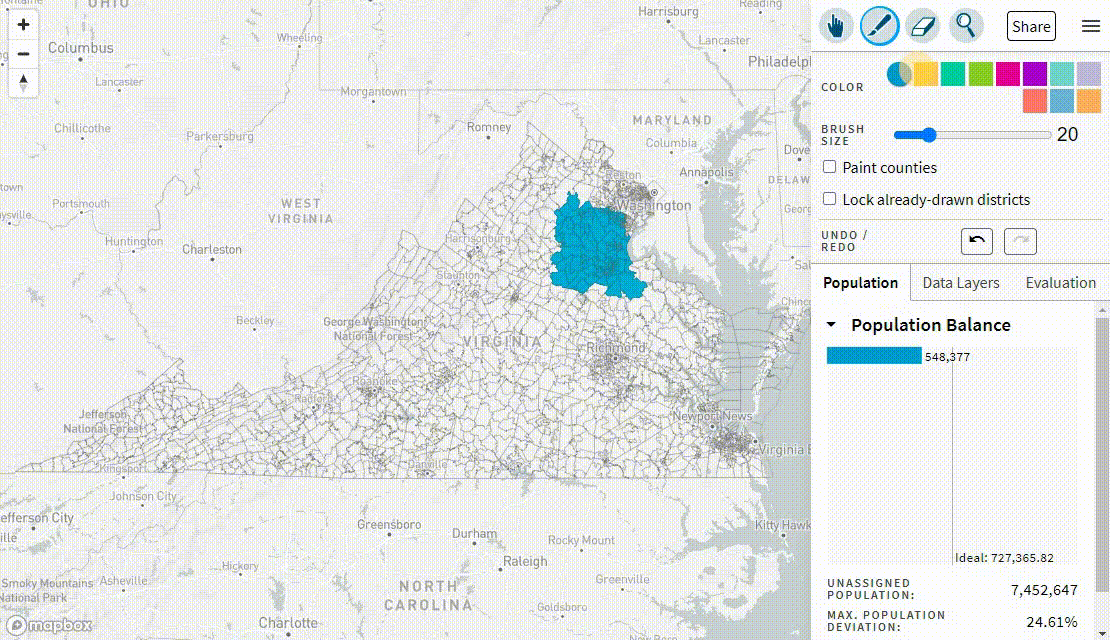
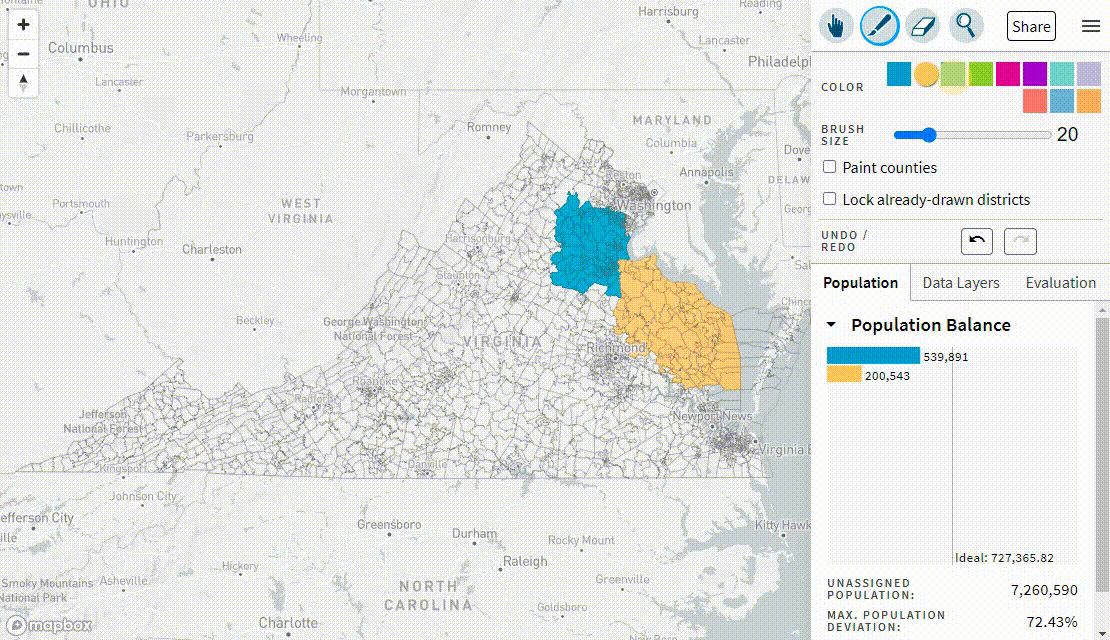
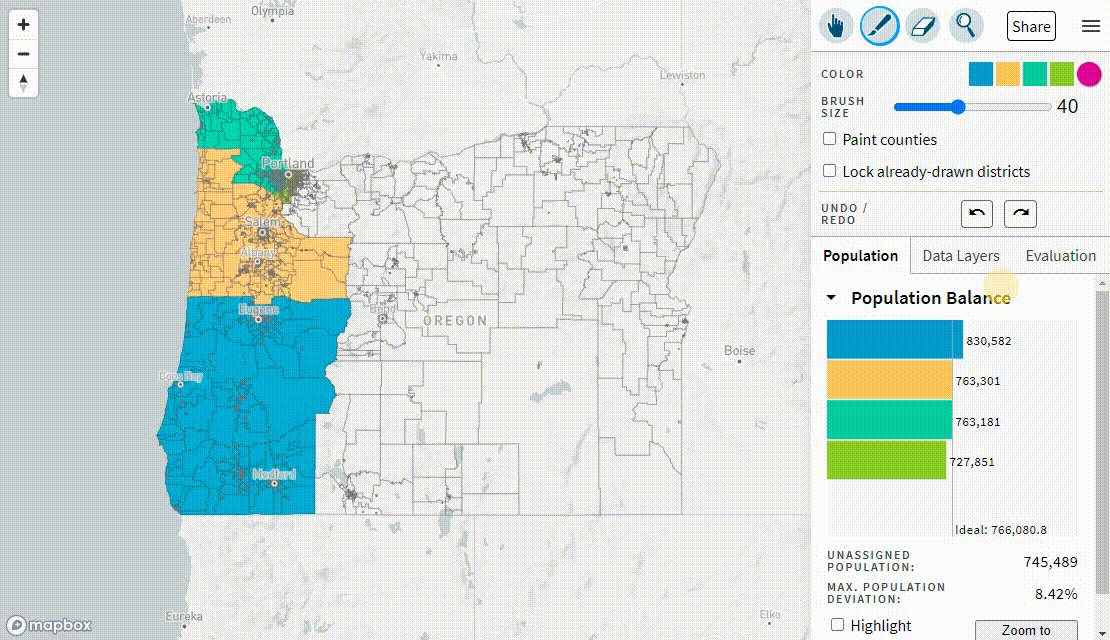
Drawing the districts
To draw your first district, select the paintbrush icon in the top right corner of the page. Click and
drag on the map to add units to your district.
To draw another district, select a new color from the color bar directly below the paintbrush icon. Each
color corresponds to a different district. For pages with large numbers of districts, only one color will
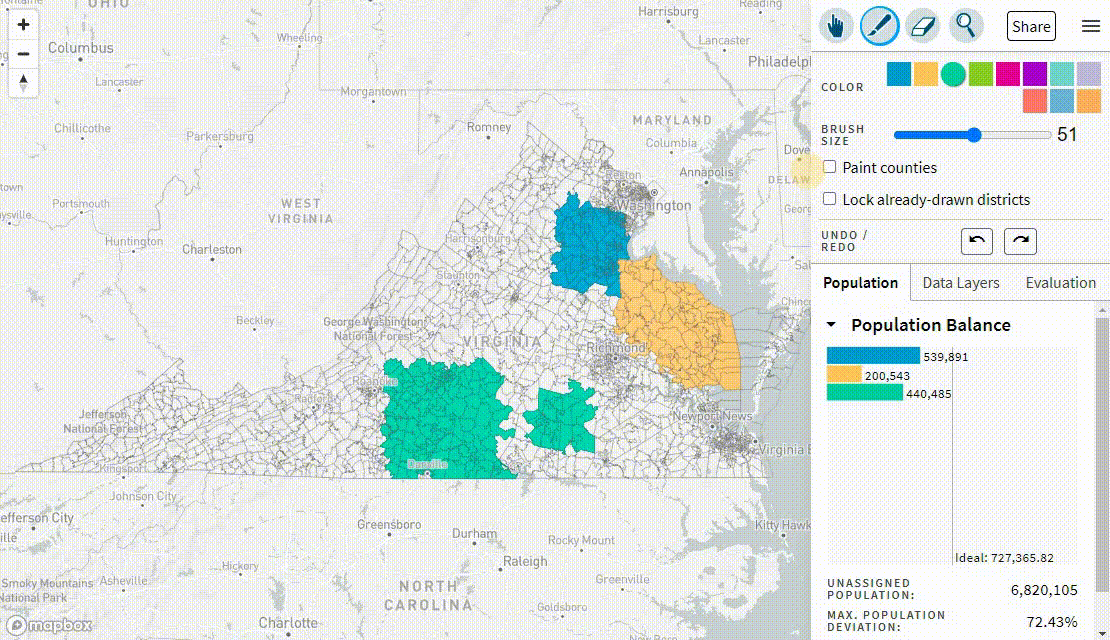
show when you start. For these, use the “+” button to add the remaining district colors.
To change the size of the brush, drag the brush size slider directly below the color bar or use the
up/down arrows to the right of the slider.
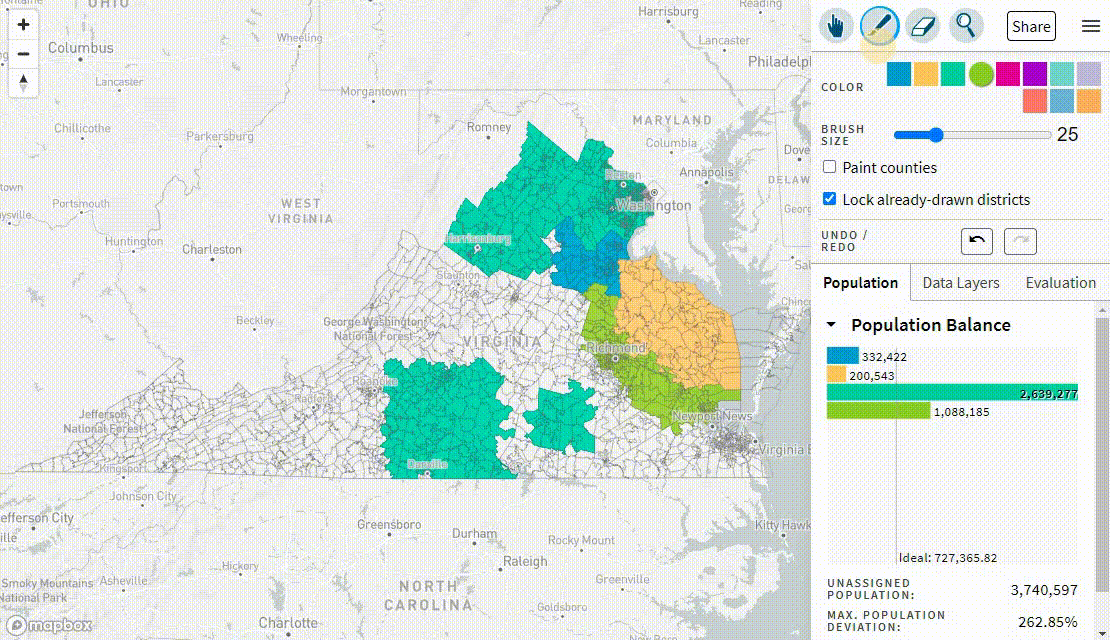
To paint whole counties, toggle the “Paint counties” box below the slider.
To inspect districts without altering them, or to avoid painting over already-drawn areas, toggle the
“Lock already-drawn districts” box.
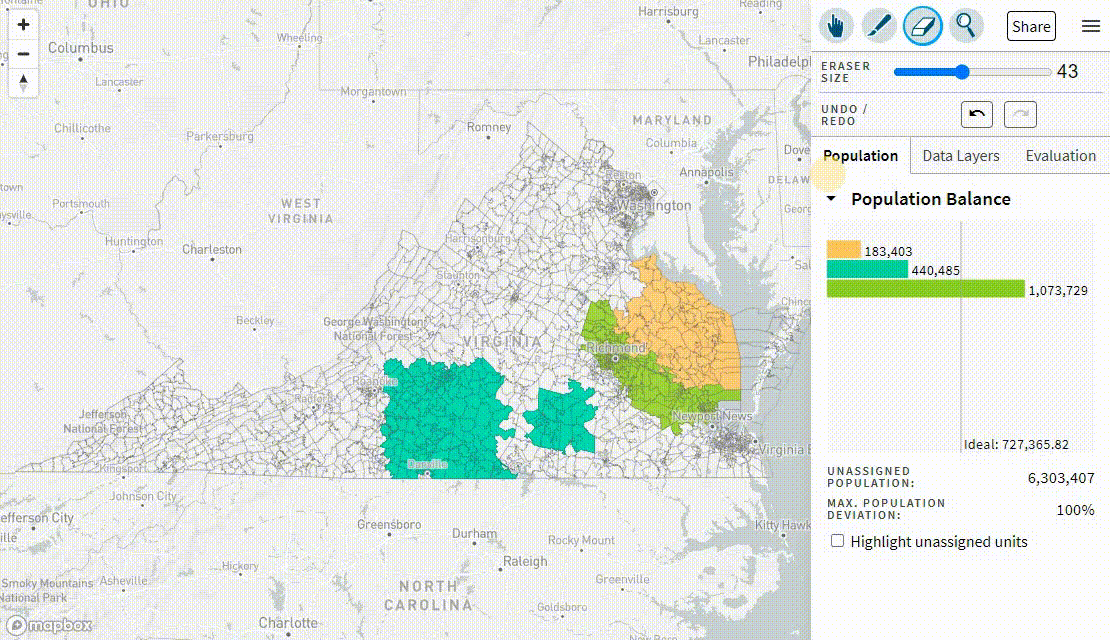
To correct the boundaries of your districts, click the erase icon in the top right corner of the page.
Click and drag to remove units from that district. The size of the eraser can be adjusted by dragging the
slider or using the arrows to its right.
Alternately, click the “undo/redo” buttons to revert the boundaries of your district plan to a previous
version. You can undo/redo as far back as your most recent use of the paint tool.
Examining the districts
To see detailed population or election information for a particular unit or group of units, select the
magnifying glass in the top right corner.
Click the Tooltip Data dropdown menu to change the type of information shown. The options available vary
by page. Then mouse over a particular unit to see the corresponding information for that unit.
To examine multiple units, drag the slider directly below the Tooltip Data menu or use the arrows to the
right of the slider.
Tabs
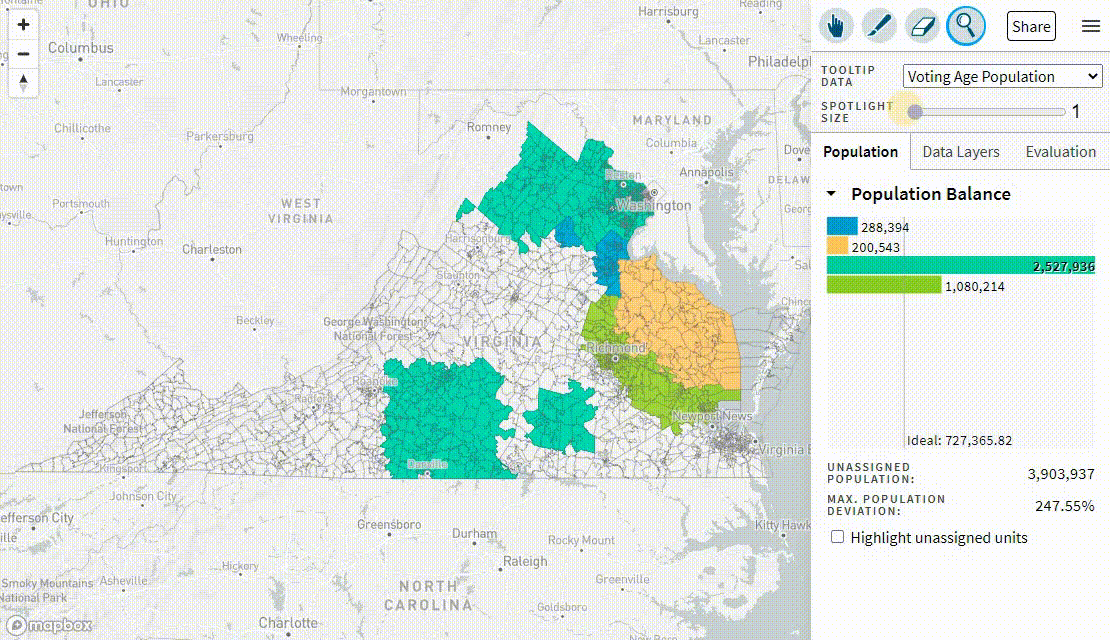
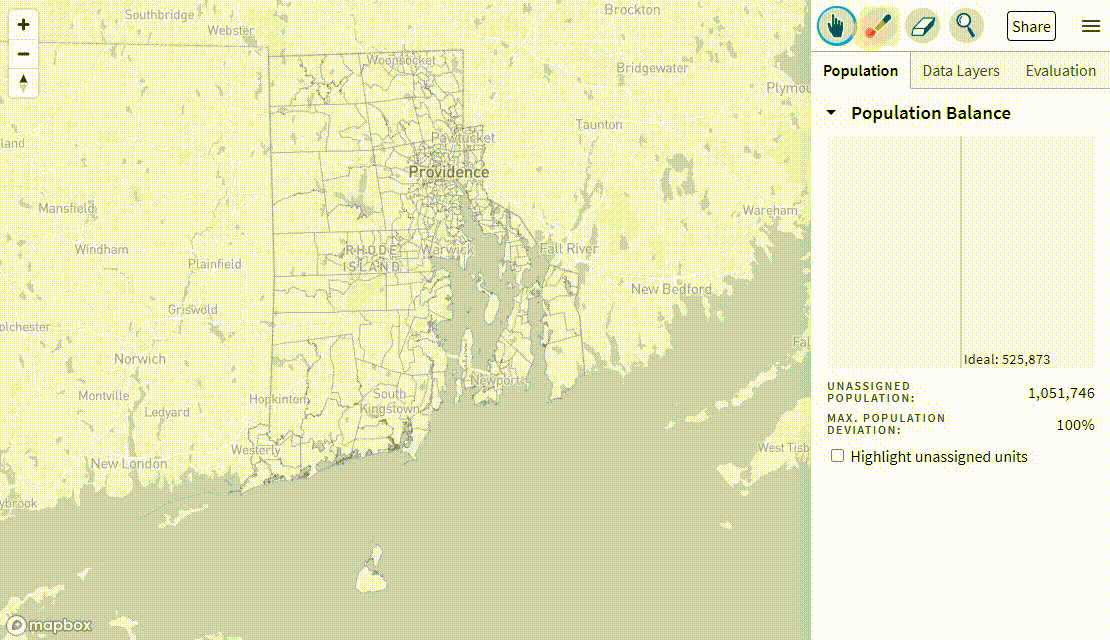
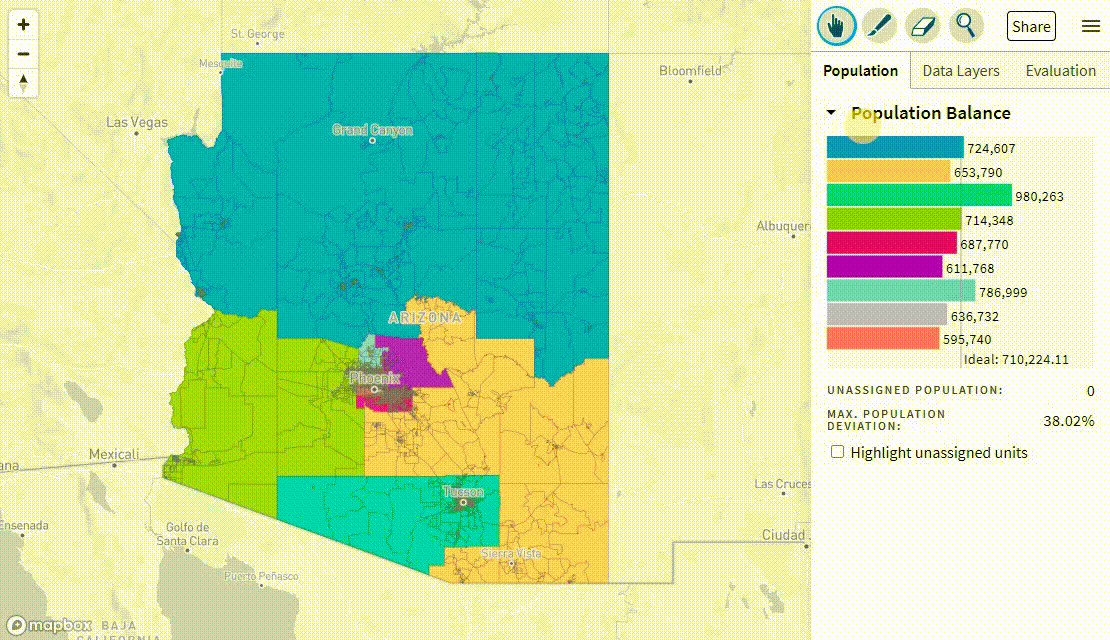
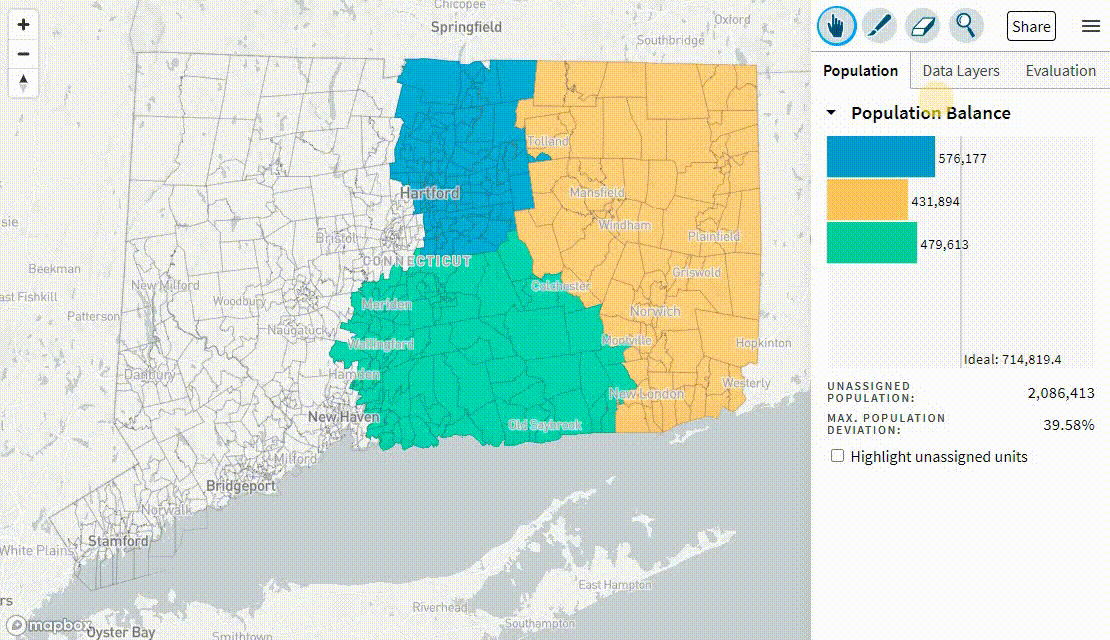
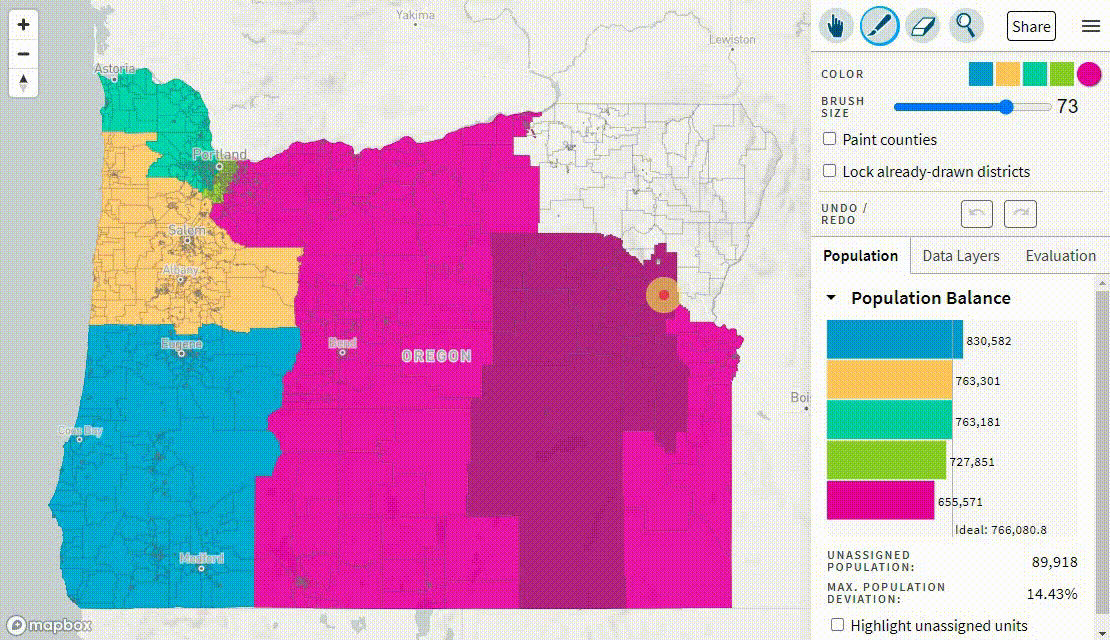
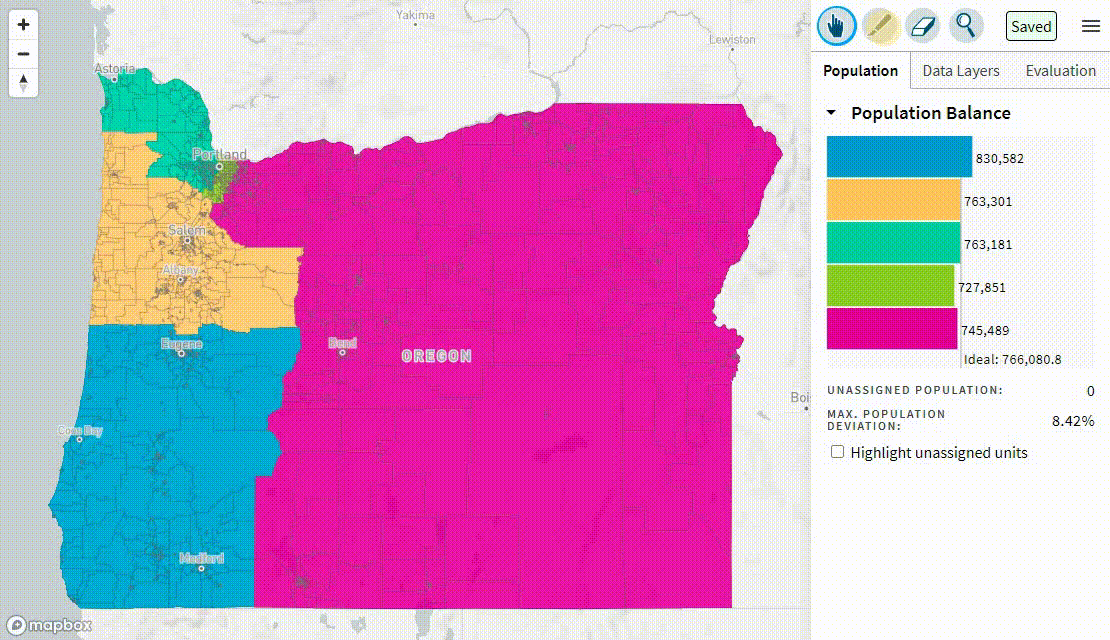
Population
The population tab allows you to view the population of each drawn district. To balance your population
evenly between districts, make reference to the ideal population count and vertical bar provided in this
tab.
To see which units you still need to color, click the “Highlight unassigned units” box at the bottom of
the tab..
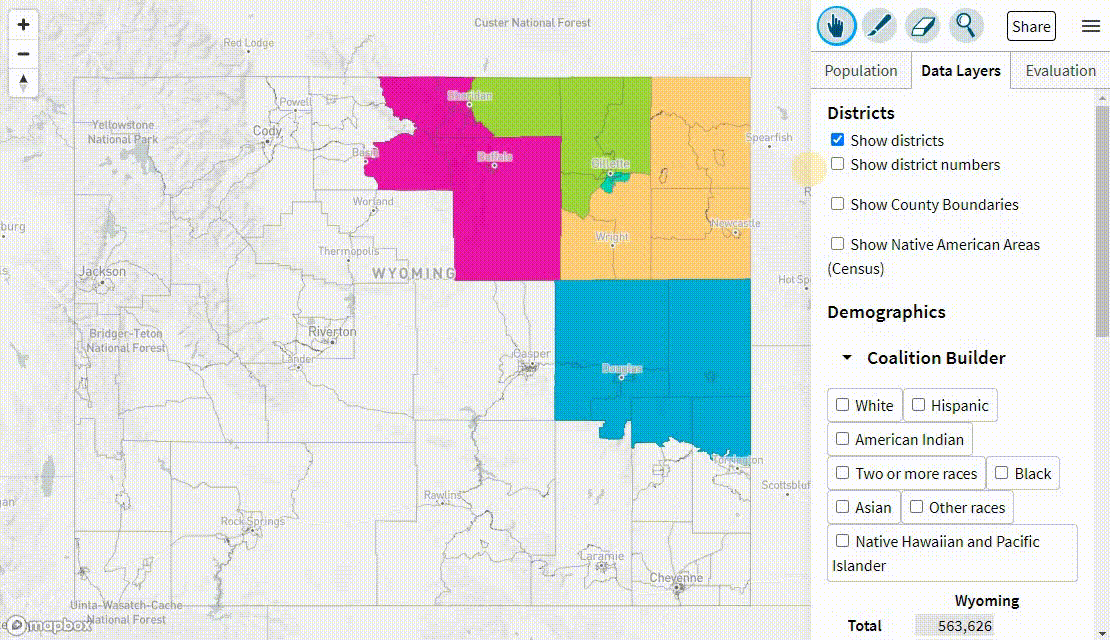
Data Layers
The Data Layers tab allows you to display districts, boundaries, demographic, and electoral data, as
available.
Districts
To hide the districts from the map, toggle the “Show districts” box at the top of the tab.
To see county boundaries overlaid on your map, toggle the “Show County Boundaries” box.
To see the boundaries and names of Nations and Tribes, toggle the “Show Nations and Tribes” box.Names
of this field vary slightly by local naming conventions.
Demographics
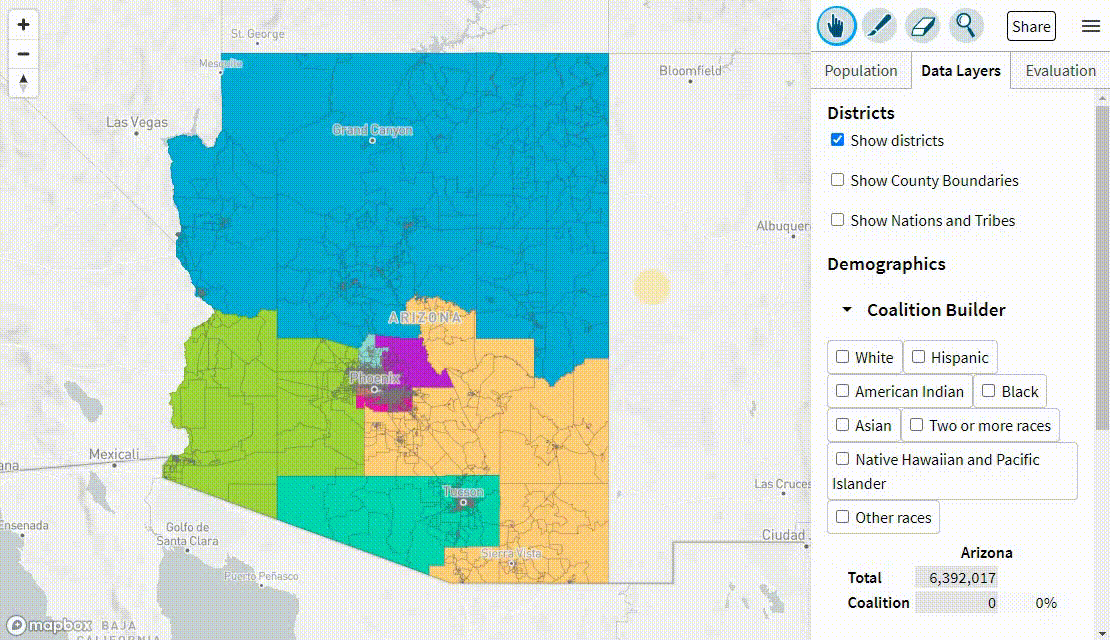
Coalition Builder
Using the Coalition Builder tool, you can combine multiple demographic groups of your choosing into a
shared “Coalition population.” Check off the name of each demographic group you want to add to your
Coalition, and click again to uncheck and remove a group. Below the selection buttons, you can view the
total population of the Coalition as well its percent composition of the jurisdiction as a whole.
Under the “Show population” and “Show voting age population” tabs, select the Coalition population
from the dropdown menu to display this layer on the map.
Race
Toggle the “Show population box” and select the desired variable from the dropdown menu to view
percent variable by unit. Using the dropdown menu for Display, choose to display the data as sized
circles or shaded regions.
Socioeconomic data
Several states and other areas feature socioeconomic data from the American Community Survey (ACS).
Available features include but are not limited to: homeownership, household income, and broadband
access. (Note: ACS data can be added to additional localities upon request.)
Previous elections
Toggle the “Show partisan lean” box and select the desired set of election results from the dropdown
menu to view partisan lean by unit. Using the dropdown menu for Display, choose to display the data as
sized circles or shaded regions. Please note that this option is only available when building your
districts out of precincts.
Evaluation
The evaluation tab allows you to see the racial and partisan balance of the
districting plan as you draw. Some districting pages have additional data for evaluation, such as household
income and age.
Population by Race
You can compare the percentage of the population by race for districts, relative to one another and
relative to the overall composition of the area. Use the drop-down menus to compare different races.
Voting age population
Voting Age Population (or VAP) is the group of people who are 18 years or older. As in the previous
section, you can compare the percentage of the voting age population by race for districts, relative to
one another and relative to the overall composition of the area. In some modules, we feature Citizen Voting Age Population (or CVAP), especially when it is cited in local guidelines.
Use the drop-down menus to compare
different races.
Partisan balance
You can compare the percentage of votes received by the Republican and the Democratic candidate for a
variety of elections, by your districts and relative to the overall partisan lean. In places where we
show candidates by other parties or variation within parties, candidate names and/or parties are listed.
Note: because we only show two-party vote shares, the overall percentage may differ slightly from
official percentages, which include third party candidates
Age, income, etc.
In some areas, there are options to evaluate the age and household income distribution of the
population in each district. Some areas also have the ability to check the contiguity of the districts
you have drawn.
Sharing your Map
Clicking the “Share” button saves the map you created and uploads it to the Districtr database. You do not
need to create an account, and only the information in your map is shared.
As long as you are in the same browser session, you can update this original map, leaving the link
unchanged. To save changes made to the map, click on the “Update” button (in the same location as the
“Share” button once you have shared). You will know when your map is up to date when the button says
“Saved.” You can keep repeating this process to edit and re-save your map as long as you are in the same
browser session.
Anyone who has the link, including you, can open up the map in their browser and make additional changes
to it. These changes can be saved to a new link by clicking “Share” again. When the button says “Saved,”
this means all changes are saved to the new link.
Whenever you need a copy of the link, click on the “Saved” button.
To download your map, choose from the options in the drop-down menu in the upper right corner. For more
detail on these, refer to the Import/Export Options page.
Tags
The Districtr team can help organize your map collection effort by setting up a tag for your organization.
A tag page is a customized landing page with a direct link to the mapping modules you'll be using and a submission
gallery showing maps that have been submitted with your group's tag. This helps organizers compile and compare a large
number of maps for a specific area, and possibly choose one or a few to highlight in their advocacy.
Once a tag has been created, users can enter it in the "Tag or Event Code" field that appears when they save a map.
(If you entered a module through a tag page, this field will be pre-filled.)